Rv in the Snow

How to Winterize an RV: Made Simple

When Should You Winterize Your RV?

When the temperatures are dropping, and you’re getting ready to hunker down for the winter, you should prepare to winterize your RV.

New camper owners might think they can park their camper in storage and be set for the winter but, if you don’t take any steps to prepare for freezing temperatures, you may end up sacrificing the longevity of your camper.

Klean Matters wants to help you protect your investment, or what may even be a home, by giving you a few essential steps you can take to keep your RV in the best shape possible. Please refer to your owner’s manual prior to winterizing as directions may differ by manufacture.

How to Winterize an RV

The biggest threat to keeping your RV in working condition through the winter is your pipework freezing. Once the water in your pipes freezes, it expands and creates cracks requiring costly and time-consuming repairs. Avoid the risk by starting your preparations as the temperatures dip into the 30s and 40s, and you can start by referencing this list!

1. Stock Up on Materials
The first step is to ensure you have all the materials you need to get started. Not every RV will need the same tools, but as long as you have 2-3 gallons of Champion RV Antifreeze, a standard tool kit, a water pump converter kit, and some basic tubing to connect the antifreeze to your systems, you can get the job done. An additional purchase of a tank cleaning wand and flushing system may be necessary if your RV doesn’t have one built in.
2. Remove/Replace Water Filters
In anticipation of pumping antifreeze through your water system, remember to remove all the inline water filters installed. This allows you to guarantee each filter is clean and ready for more trips when the ground thaws out. You can also take the opportunity to replace any expired filters.
3. Flush Out Your Tanks
Bring your RV to a dump station or campground sewer hookup to empty your black and gray tanks. Make sure to leave the hose connected a little longer than usual to ensure everything is drained from the system. Finish this step by flushing both tanks. Now’s the time to use your cleaning wand and external flushing system if your RV lacks a built-in system.
4. Drain Your Water Heater Tank
Remove the drain plug on your water heater to empty it. Turn the water heater off before draining it and make sure to leave enough time for the water to cool. Give it time to fully drain before replacing the plug. As the water drains, open all the faucets and remove all drain plugs to help empty the water out of the tank. Turning on the water pump can drain the water faster, but don’t forget to turn it off when the water pressure is low, or it can damage your pump. Close all the faucets and drain plugs when the process is finished.
5. Bypass the Hot Water Heater
The majority of modern RVs have a hot water heater bypass kit pre-installed to ensure the water heater doesn’t fill with antifreeze. If your RV lacks a hot water heater bypass kit, you can take the time to install one yourself or contact a local professional to complete the work for you.
6. Pump Antifreeze Through Your System
Now you can install your water pump converter kit to begin running antifreeze into your system. If you don’t have a water pump converter kit available, you can disconnect an already existing water intake line and place it directly into the antifreeze container. More tubing may need to be attached for this method to work.
7. Run the Water Faucet Closet to the Water Pump
Open the cold faucet and watch it trickle until you see the colored liquid. Do the same for the hot faucet. Repeat the process with each sink until antifreeze is flowing from every faucet. Switch out the antifreeze bottles when one is finished, and don’t forget the outdoor shower if your RV has one.
8. Flush Your Toilets Repeatedly
Flush your toilets until you can see antifreeze in the bowl. Once the colored liquid makes it into the bowl, you can guarantee the antifreeze has spread throughout the septic system.
9. Pour a Cup of Antifreeze Into Your Sinks and Toilets
Pouring a cup of antifreeze into the drain and into the toilet ensures that the antifreeze spreads into the plumbing lines and all the way into the gray tank. Flush the toilet a few more times to ensure the antifreeze circulates into the holding tank.
10. Prep For Long-Term Storage
Double-check that the hot water heater heating element is off and all the faucets are closed. Finally, your RV is ready to face winter conditions.
11. Consult Your Owner’s Manual for Additional Preparations
An RV’s ice maker and washing machine can vary in construction, so it’s best to consult the owner’s manual when determining the best winterizing method. Once you’ve checked that these systems are properly winterized, you won’t have to worry about your RV’s plumbing until spring.

As an extra tip, when storing your RV for the winter it’s best to lay a few rodent and bug traps throughout the space to discourage any pests from making your RV their winter hideout.

Before starting your winterization procedures, you should know what kinds of antifreeze will work best with your vehicle.

RV Antifreeze Options

When deciding which antifreeze to choose from, we recommend Champion Blended RV & Marine Antifreeze or Champion Premium RV & Marine Antifreeze. Both of these options are created specifically for winterizing recreational vehicles and is considered GRAS (Generally Recognized as Safe) by the Food and Drug Administration, but what sets them apart?
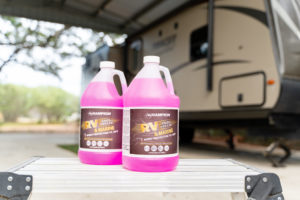
Champion RV Antifreeze and Windsheild Fluid 21 Resized

Champion Blended RV & Marine Antifreeze:

  • Burst-proof protection down to -50° F
  • Ready to use
  • Alcohol blend
  • Non-staining formula
  • Safe for metals and plastic (except acetate)
  • Heat-sealed bottle
  • Filtered for purity

Champion Premium RV & Marine Antifreeze:

  • Burst-proof protection down to -50° F
  • Ready to use
  • Alcohol-Free
  • Non-staining formula
  • Safe for metals and plastic (except acetate)
  • Non-toxic when used as directed
  • Odorless
  • Heat-sealed bottle
  • Filtered for purity

Both options will perform well and get the job done. It just depends on what benefits you prefer.

Where to Find RV Antifreeze for Your Winterizing Needs

Klean Matters, where you will find where to purchase our Champion RV Antifreeze products and also as winter approaches be sure to check out our Champion Windshield Washer Fluid products.


Need some assistance? The professionals at Kleanmatters can help. Please contact us to learn more.

Scroll to Top